
Schedule in TimeEdit
Your personal schedule in TimeEdit gives you a complete view of the centrally planned schedule, also known as the collective schedule, your individual activities and the reservations you have made in the system. You can view the schedule in your digital calendar by creating a subscription.
You start by searching out your schedule in Time Edit, then add a subscription in the desired calendar program.
Find your schedule
Login to TimeEdit External link, opens in new window..
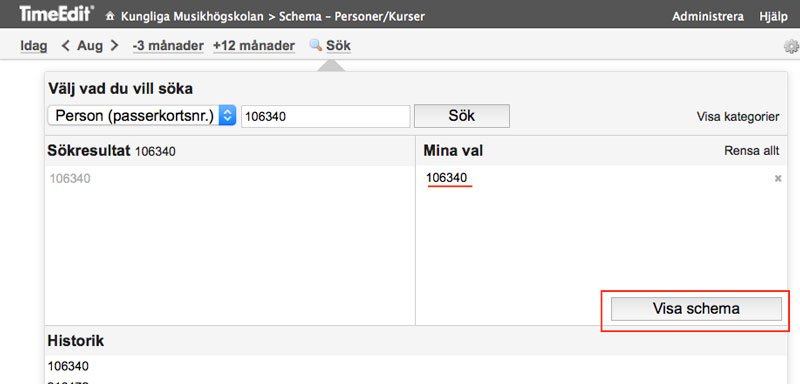
- Choose Sök schema – Personer, Personal schedule.
- Enter your keycard number and press Search.
The preset time span for the schedule is from the current day and 10 months ahead. The time span can be changed in the upper left hand side of the page.
Relative start and end dates are counted in relation to each other. In the example below, -3 months and +12 months mean that if today's date is April 1, you will get the schedule from 1 January 1 (-3 months) until 1 January, the following year (+12 months from January 1).
- Click Show Schedule.
Add a subscription to your calendar
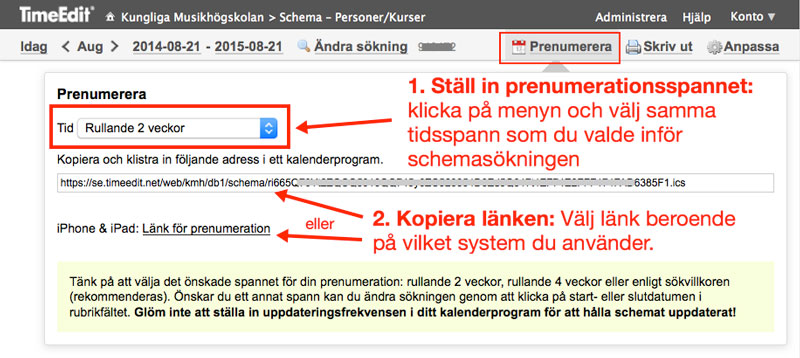
- Click Subscribe in the upper right part of the page (no. 1 in the picture below).
- Set a time span for the subscription.
- Kopiera därefter länken, den övre för Android/Google, den nedre för iOS/OS X/iCal.
- Then copy the link, the upper one for Android / Google, the bottom for iOS / OS X / iCal (no. 2 in the picture below).
From here the instruction differs depending on what system you use. The descriptions assume you are using a computer. To access the calendar via smart phone, you may need to make additional settings in the phone.
iOS/OS X
- Open the programme iCal.
- Choose File > New Calendar Subscription.
- Paste the TimeEdit generated link, then click Subscribe.
- Select refresh rate and click OK.
Android/Google
- Log on to your Google-account, via, for example, Gmail.
- Open the calendar via the app symbol, next to the login button.
- Next to Other calendars on the left, click the Down arrow Down Arrow, and select Add by URL.
- Enter the calendar's address in the field provided.
- Click Add Calendar. The calendar will appear on the left side under Other calendars.